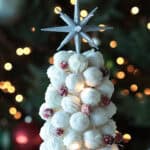
Christmas Cake Ball Tree
Servings: 40
Calories:
A fun festive cake ball tree that will make your holiday dessert table shine!
Print Recipe
Equipment
Ingredients
- 1 15.25 oz box Moist Yellow Cake Mix I use Betty Crocker's Super Moist
- 1 16 oz container Cream Cheese Frosting
- 12 oz white Chocolate (Chocolate Chips or Candy Melts)
- sprinkles
- EZ Thin Dipping Aid *See notes
Instructions
- Bake the Cake: Prepare the cake according to the instructions on the box, but leave out the oil. This helps the cake hold its shape when crumbled. Bake until a toothpick comes out clean, then let it cool completely.
- Crumble the Cake: Once the cake is cooled, crumble it into small pieces in a large bowl. Add ¾ of the tub (12 oz.) of cream cheese frosting to the crumbled cake and mix until well combined. You can do this by hand or use a mixer for a quicker process.
- Form the Cake Balls: Use a mini ice cream scoop to portion out the cake mixture, then roll each scoop into a ball using your hands. Place the cake balls in a Tupperware container with parchment paper between the layers to prevent them from sticking. Freeze for about 30 minutes to firm them up.
- Prepare the Chocolate Coating: While the cake balls chill, melt the chocolate. If you have a mini crockpot or the Wilton melting pot, great! If not, you can melt the chocolate in a microwave-safe mug. Heat the chocolate in 30-second intervals, stirring between each until fully melted. Add a spoonful of EZ Thin (or vegetable oil) to make the chocolate smoother and easier to work with.
- Dip the Cake Balls: Once the cake balls are chilled and your chocolate is melted, it’s time to dip! Insert a toothpick into each ball and dip it into the chocolate, making sure it’s fully coated. Hold the cake ball at a 45-degree angle and gently rotate it until the excess chocolate drips off. Place the dipped cake ball onto a parchment-lined or nonstick surface.
- Patch Up the Holes: When you remove the toothpick, there may be small holes where the toothpick was. No worries—just dip a small spoon or your finger into the melted chocolate and patch up the hole while the chocolate is still wet.
- Decorate: While the chocolate coating is still wet, add sprinkles, candied cranberries, or any other fun decorations. Let the cake balls set for about 15 minutes until the chocolate hardens.
- Assemble the Tree: Use a Styrofoam cone to assemble your cake ball tree. Stick mini toothpicks into the bottom of each cake ball and gently insert them into the cone, working your way up in layers. You can place the cake balls closely together, but there will be small gaps. If that bothers you, add more decorations like cranberries or icing to fill the gaps!
- Optional Sparkle: For an extra festive touch, add a string of fairy lights around the tree to make it glow. It’s a fun way to brighten up your tree and make it stand out.
- Storage: Store your cake ball tree in the fridge for up to a week, or in Tupperware for a few days if you prefer not to refrigerate it. It’s best made 2-3 days in advance so you can focus on other holiday prep.
Notes
Expert Tips:
1. Chill Before Dipping: Freezing the cake balls for 30 minutes ensures they don’t crumble when you dip them into the chocolate.
2. Fill Gaps: If you don’t like the small gaps between the cake balls, cover them with extra decorations like cranberries or icing to make it look perfect.
3. Make in Advance: Prepare the cake balls 2-3 days ahead to save time and reduce stress on the day of your event.
4. Customization: Use any colored candy melts or sprinkles to match your holiday theme. Red, green, or even gold can add a touch of glamour to your tree!