These Cheesy Stuffed Biscuits are an easy and quick way to enjoy garlic knots but 1,000 times better! I use Pillsbury's canned biscuit dough because they yield an incredibly soft and tender dough every single time. A mouth watering appetizer or side dish that can be ready in 30 minutes!
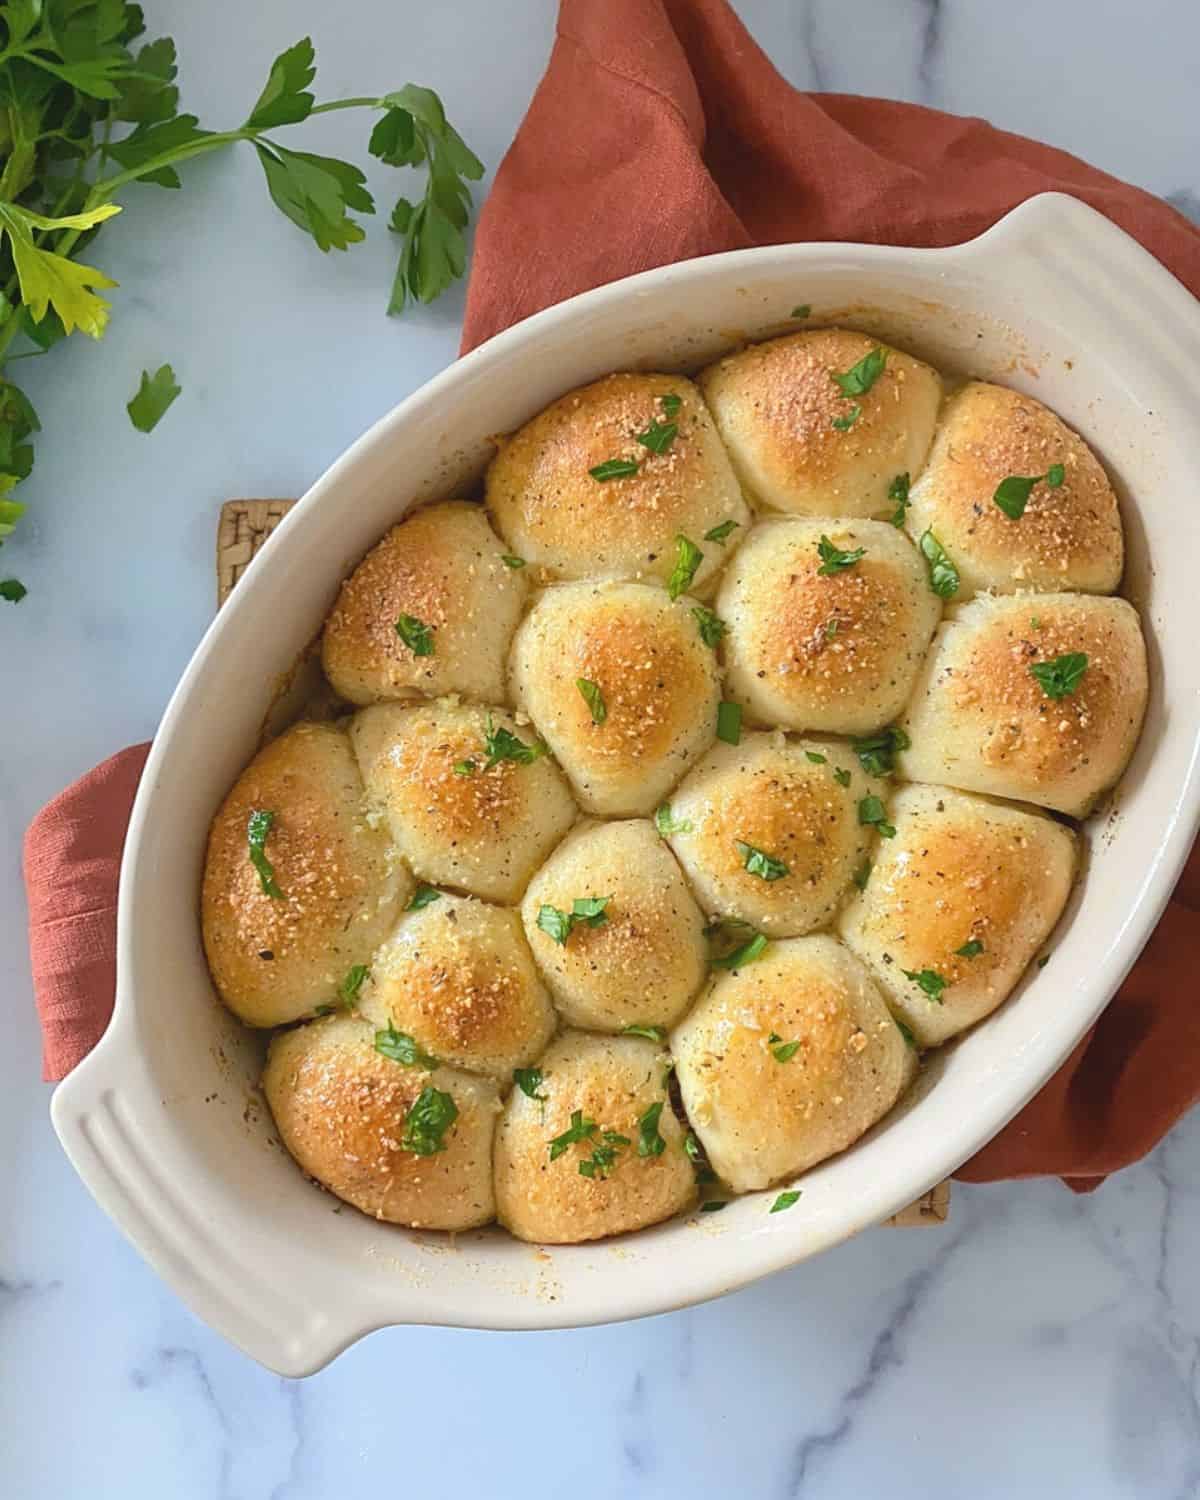
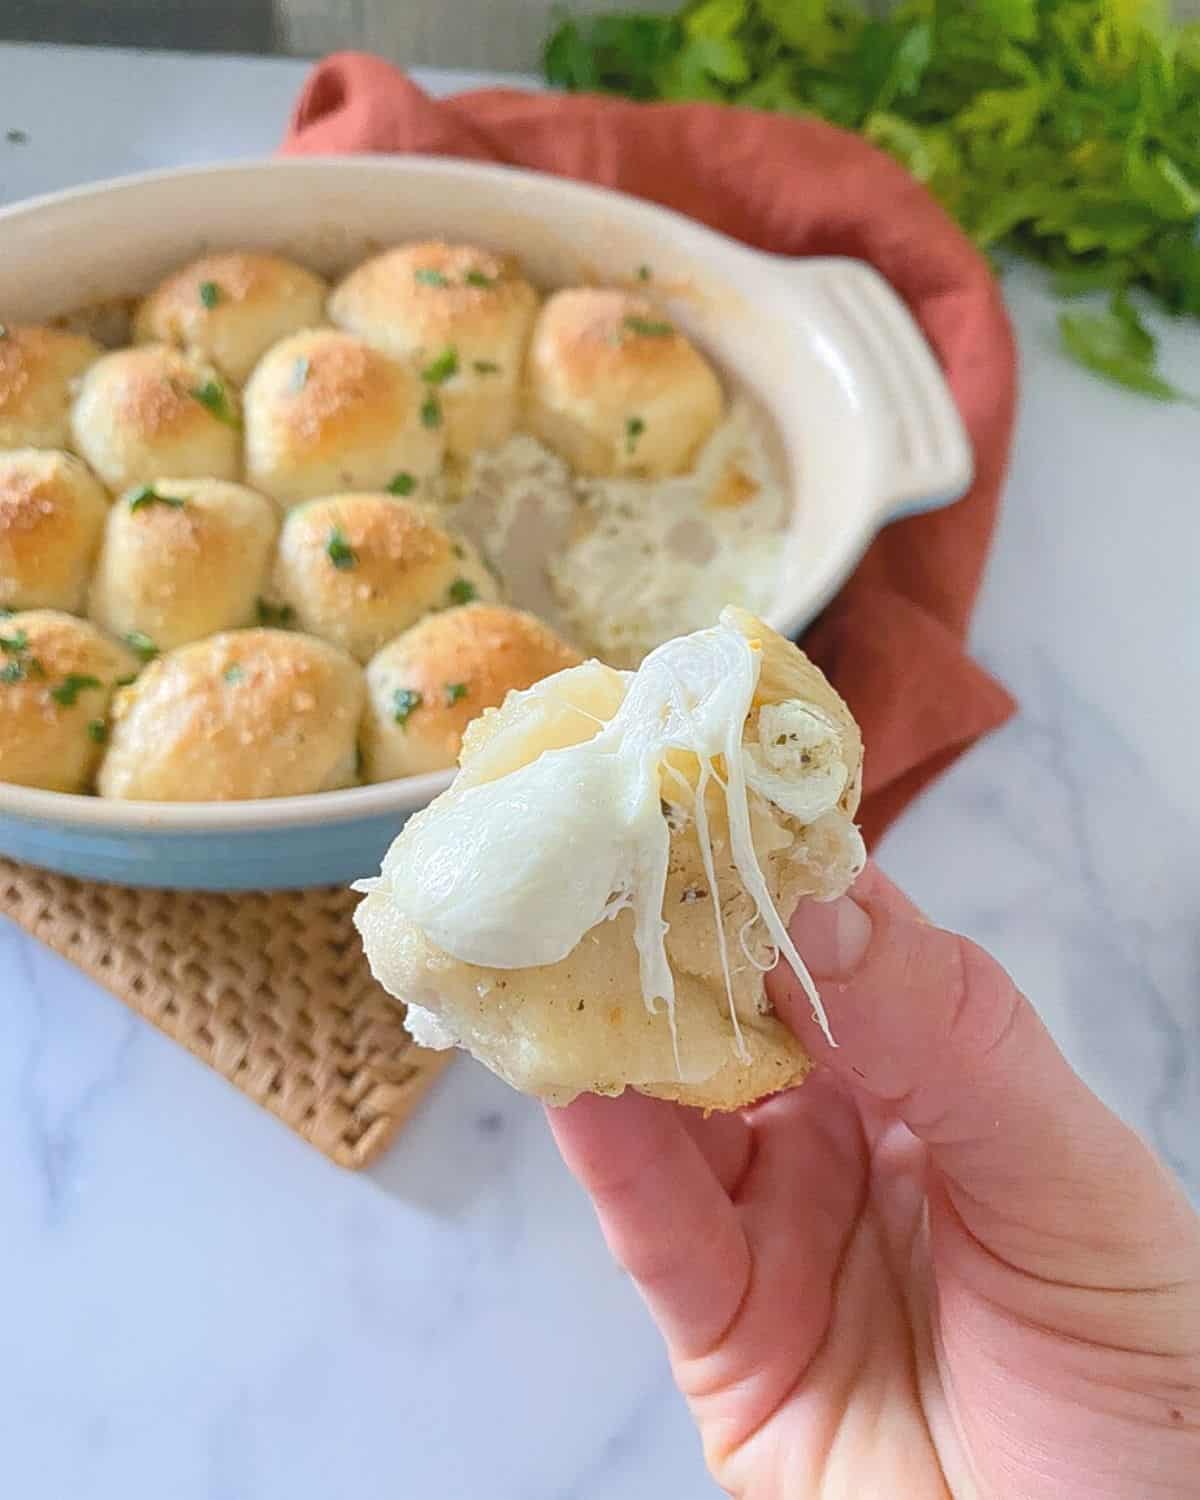
Stuffed to the brim with mozzarella cheese and smothered in a garlicky butter? I mean, come onnnn.
These mozzarella stuffed garlic bombs have got to be one of the most indulgent appetizers I have on my blog. Other than my Cheesy Garlic Italian "Dunkers" which use Pizza Dough. (Those are ah-mazing)!
I love Pizza Hut's version of stuffed garlic bombs but hate to know what's really inside...So I decided to create my own homemade stuffed biscuit copycat version. But these, in my opinion, are BETTER than Pizza Hut's!
Instead of using pizza dough, I opted for a safer, tastier route...BISCUIT DOUGH! Pizza dough is risky. It can come out tough sometimes especially if you work the dough too much.
When it comes to these biscuits, they are already pre-cut and portioned out perfectly. So all you need to do is pull-apart, stuff, and slather in garlic butter!
I chose not to KNOT the dough for a few reasons but mainly to make these EASIER! I think it was the best decision because the tops come out slightly crispy while the bottom stays super moist, flakey and buttery. You wont miss the knot, I promise you.
Have you tried my Mini Biscuit Dough Calzones yet??
Ingredient Tips:
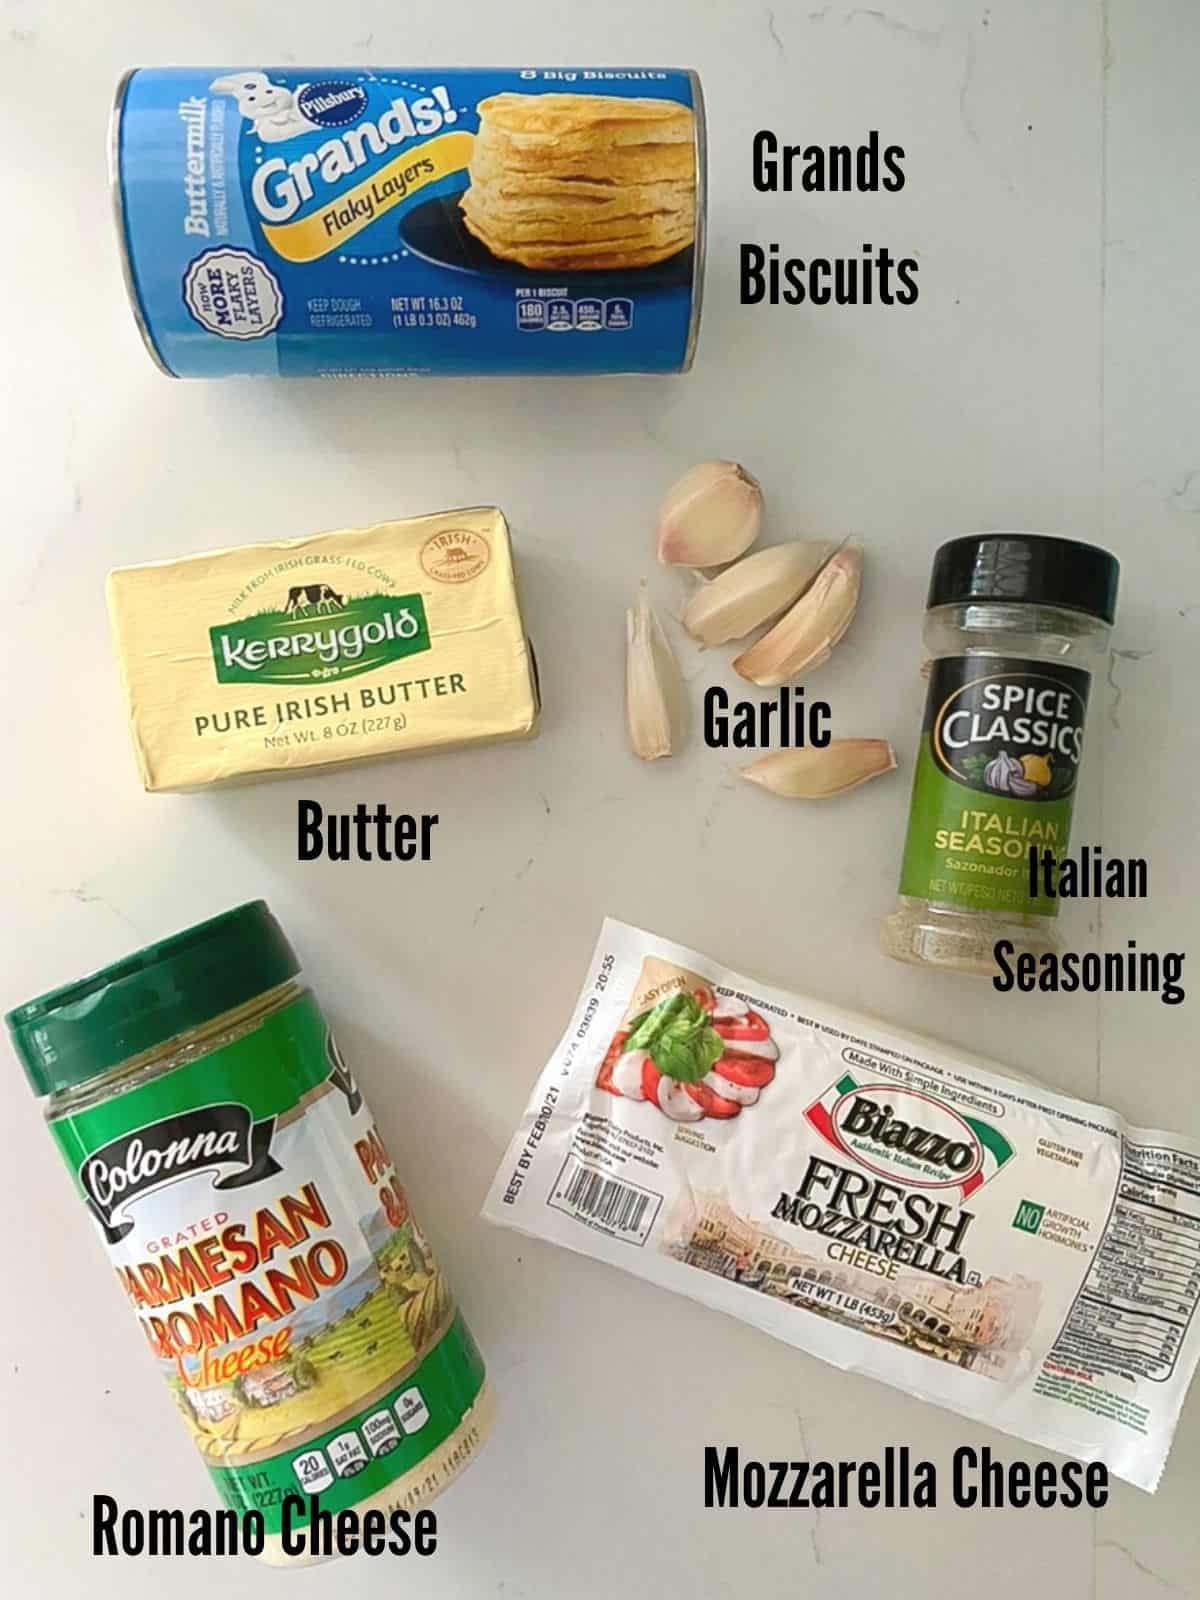
- Pillsbury Grands Flaky Layers- This kind is the kind you want to get because they easily pull apart. If you use regular biscuits, they will be tough to separate and stuff. You can also make your own homemade biscuits from scratch if you wish.
- Mozzarella Cheese- You want to get the best cheese you can find. Pre-shredded cheeses don't melt as well and make it tougher to stuff.
- Italian Seasoning- To make it easy, I used dried Italian seasoning. It is a mixture of dried herbs like parsley, basil, thyme and oregano. You can also make your own homemade seasoning.
- Garlic- I would stick to the real stuff here but if you only have granulated, you can use that.
- Pecorino Romano Cheese- This adds another layer of flavor and salty bite.
Stuffing Tips
Although these are similar to garlic "knots", I opted to skip tying the "knot". This is because it takes more effort, time and does not allow for us to stuff as much cheese in the center as we want.
The way I stuffed them allows them to puff up like flaky little pillows with lots of cheesy goodness awaiting inside.

Step 1: Each can of biscuit dough comes with 8 biscuits. They are called flaky "layers" for a reason. They have lots of layers which make them super easy to pull apart and stuff with cheese. You want to fill each round with as much mozzarella cheese as possible while still allowing you to close them up into a little ball.
Step 2: Once you stuff and pinch each biscuit, place them face down in a buttered baking dish. You do not want your biscuit bombs touching because they will expand as they bake.
Step 3: Brush the tops with garlic butter and your grated Pecorino Romano cheese.
Step 4: Bake until the tops are golden brown and slightly crispy.
Serving Ideas
With the Super Bowl around the corner, these would be a delicious addition to your menu. They can be served as an appetizer, snack or side dish! I'm thinking they would pair perfectly with chili. Also check out my other 51 Football Party Finger Foods You Need To Serve!
Another idea is to serve your stuffed garlic knots alongside of some marinara sauce or pizza sauce for dipping! The pop of color next to the dish would be beautiful.
Frequently Asked Questions
Yes! But wait to bake them! You can do everything, including stuffing them, in advance. Once that's done, cover them and store them in the fridge until everyone is ready to indulge.
Yes, pop them back in the oven at the same temperature for 5 minutes or until warmed through.
Yes BUT they won't turn out as tender, moist or buttery.
Yep! I recommend freezing them before baking. Then you can stuff and close your bombs and flash freeze them flat first. (This will keep them from sticking to each other.) Once they are almost frozen, add them to a plastic baggie or Tupperware. They should keep for 6-8 weeks.

Other cheesy stuffed biscuit appetizers:
Holiday Stuffing Biscuit Cups (with Sausage)
Cheesy Sausage Stuffed Pillsbury Biscuits (with jalapenos)
Creamed Corn Biscuit Cups (An Easy Thanksgiving Appetizer)
Check out my recent recipes!


Questions? Ask below! If you've made the recipe, make sure to rate it!
Stuffed Biscuits
Ingredients
Method
- Preheat oven to 350°F.
- Add melted butter, minced garlic, and Italian seasoning to a small bowl and mix.
- Brush a 9" baking dish with butter. (You will not use all the butter yet.)
- Chop up your mozzarella into 16 cubes. (about ½ oz. cubes)
- Open your biscuit dough and take each of the 8 biscuits out. Using your hands, pull apart each biscuit in HALF. You should have 16 biscuits.
- Stuff the center of each biscuit round with a chunk of mozzarella cheese. Pull the dough up and around the cheese pinching closing using your fingers. It should look like a little satchel.
- Repeat with the rest of the biscuits.
- Place each stuffed biscuit pinched-side down in the baking dish. They should barely be touching. Space in between in okay since they will expand in the oven.
- Brush the rest of the garlic butter generously on top of each biscuit. You don't need to use it all...but why not. 😉 Sprinkle grated cheese over top.
- Bake on the middle rack for approximately 20 minutes or until the tops are golden brown.
- Remove from the oven and garnish with freshly chopped parsley. Enjoy while still warm!
Nutrition
Notes
Yes, pop them back in the oven at the same temperature for 5 minutes or until warmed through. "Can I use pizza dough instead of biscuit dough?"
Yes BUT they won't turn out as tender, moist or buttery. "Can I freeze these?"
Yep! I recommend freezing them before baking. Then you can stuff and close your bombs and flash freeze them flat first. (This will keep them from sticking to each other.) Once they are almost frozen, add them to a plastic baggie or Tupperware. They should keep for 6-8 weeks.


Meredith Schultz
I love these, they're SO GOOD! Definitely making these again.
Aleka Shunk
thank you!!
Carolyn
Great recipe! We added more garlic with the cheese and added more herbs. Will try a few different cheeses next time. Thanks!
Amber
These are soooo good! We are making them for the second time tonight and doubling the cheese! Totally not necessary, but we want to see was extra cheese is like! So good!!
Aleka Shunk
Hi Amber, I'm so glad you enjoyed these! You can never have too much cheese. ?